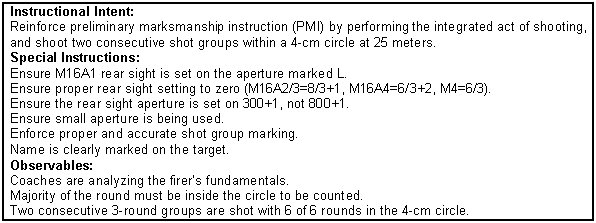
This chapter contains guidelines for the instructor-trainer to conduct training on ranges that provide detailed feedback from the targets down range, such as bullet impact locations and shot group size. Primarily this chapter contains grouping and zeroing procedures and how to conduct the 3 types of known distance ranges. It also contains the instructional intent, special instructions, and subject areas that should be observed to ensure quality training.
Downrange feedback provides precise knowledge of what happens to bullets at range. It provides for an effective transition between 25-meter firing and firing on the field-fire range. Knowing precisely where all bullets are hitting or missing the target, the poor firer (with instructor-trainer assistance) can improve his performance and the good firer can bring his shots to target center. Firers develop the knowledge and skills required to perform with confidence on the field-fire range, where only hit-or-miss information is available.
|
NOTE: |
The TRADOC commander must approve any change to the authorized qualification courses. All questions concerning authorized qualification courses should be forwarded to: Commandant, US Army Infantry School, ATTN: ATSH-INB, Fort Benning, GA 31905. |
This paragraph provides guidelines for the instructor-trainer to conduct a grouping range (Figure 5-1). It includes concept, organization, shot group marking, shot group analysis, multiple shot group analysis and troubleshooting of the fundamentals.
Figure 5-1. Grouping procedures.
a. Concept of Grouping. Shot grouping is a form of practice firing with two primary objectives: firing tight shot groups and consistently placing those groups in the same location. Shot grouping should be conducted between dry-fire training and zeroing. The initial live-fire training should be a grouping exercise with the purpose of practicing and refining marksmanship fundamentals. Since this is not a zeroing exercise, few sight changes are made. Grouping exercises can be conducted anywhere that provides precise location of bullet hits and misses such as a 25-meter live-fire zeroing range, KD range, Weaponeer, MACS, LOMAH, LMTS, or EST. No sight adjustments should be made to the sights until the firer can shoot six consecutive shots (two shot groups) inside a 4-centimeter circle. Once this is accomplished the soldier is now ready to conduct zeroing procedures.
b. Organization of Grouping on a 25-meter range. The organization and conduct of a grouping range are based on the availability of ammunition, number of personnel, and the firing ability of personnel in training.
(1) The unit is divided into firing orders. The first order fires while the second order coaches. Ten firing points are reserved to conduct corrective instruction.
(2) Sandbags should be provided at each firing point to accommodate supported firing positions (Figure 5-2).
(3) Each shot is fired using the same aiming point (center of mass) from a supported firing position.
(4) Each soldier ensures his sights are set for 25-meter firing.
(5) The soldier fires a three-round shot group at the 25-meter zero target. The firing line is cleared, and he moves downrange to examine the shot group. The soldier and coach examine the shot group for fundamental errors, triangulate the shot group and put the number 1 in the center of the shot group.
(6) If the shot group is off of the 25-meter zero target the weapon should be mechanically zeroed. If the shot group is barely on the target a bold adjustment should be made.
(7) Each shot is fired using the same aiming point (center of mass). The objective is to fire tight shot groups and to place those shot groups inside a 4-centimeter circle (the actual location of groups on the target is not important).
(8) The soldier returns to the firing line and fires a second three-round shot group.
(9) The firing line is cleared, and he moves downrange to examine the second shot group, triangulate, and mark the center of the shot group with the number 2. The soldier groups the two shot groups and marks the center.
(10) Steps 1 through 8 are repeated until the soldier places six out of six consecutive rounds inside a 4-centimeter circle. (The majority of the round must be inside the circle or it is not counted). If the soldier is not grouped in 18 rounds, he should be removed from the firing line and given remedial training before attempting to group again.
(11) Once firing proficiency has been demonstrated from the supported firing position, grouping exercises can be conducted from the unsupported firing position. For example, 27 rounds are allocated for the grouping exercise, if the soldier groups in 18 rounds, he can fire the remaining 9 rounds from the unsupported firing position.
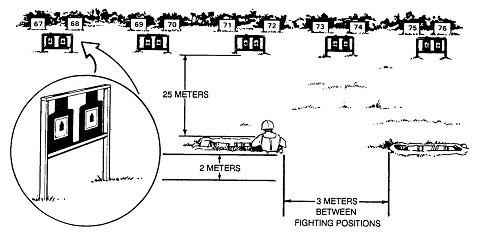
Figure 5-2. The 25-meter range.
c. Shot-Group Marking. The instructor-trainer must understand how to analyze shot groups correctly. If the soldier is to benefit from this exercise and if the instructor-trainer (or coach) is to provide useful guidance, the soldier must mark each shot group for a clear record of his firing practice (Figure 5-3). He connects the three bullet holes on his target with a straight line and places a number inside the shot group. The number represents the center of the three shots. When two shots are near one end of the group and the third shot is toward the other end, the number is placed closer to the two near shots (Figure 5-4). This is not a precise marking that requires a measurement but a procedure to help shot-group analysis. The three-round shot group allows the firer's performance to be evaluated. While some of the variation in a single shot group is due to the rifle and ammunition.
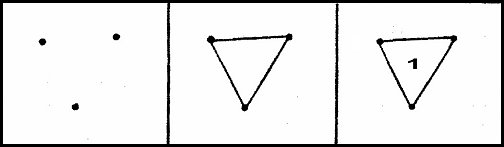
Figure 5-3. Shot-group marking.
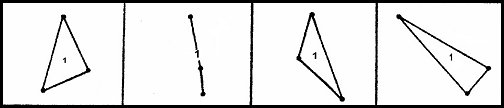
Figure 5-4. Central point of an odd-shaped group.
d. Shot-Group Analysis. The purpose of shot-group analysis is to identify firer errors on the single shots of a shot group so the soldier can correct these errors while firing the next shot group. Shot-group analysis begins with the instructor-trainer observing the soldier while he fires. The instructor-trainer observes the firer's position, aiming, trigger squeeze and breathing. The instructor-trainer then analyzes the shot group to confirm problem areas. The coach should not use shot-group analysis as a stand-alone tool without observing the firer. The ideal shot group will have all three rounds within a 2-centimeter circle. Three rounds within a 4-centimeter circle is the minimum standard.
|
NOTE: |
The M16A2 zero target squares are .96 centimeter in size while the M4 zero target squares are 1.3 centimeters in size. Two single shots on a 25-meter zero target that are 2 centimeters apart does not equate to two squares from each other on the M4 zero target. The M16A2 25-meter zero targets difference in distance is so small that it can be disregarded. |
(1) Match-Grade Performance. The target shown in Figure 5-5 illustrates a match-grade quality rifle-ammunition combination, which places all bullets in almost the same hole, and helps detect the slightest errors of the firer.

Figure 5-5. 25-meter match grade performance.
(2) 2-Centimeter Shot Groups. When firing a standard service rifle and standard ammunition combination the dispersion pattern may be up to 2 centimeters apart without human error. This dispersion pattern is not considered firer error. The targets shown in Figure 5-6 reflect possible 25-meter shot group performances by standard rifle-ammunition combinations and proper soldier performance. The variances of the standard rifle and standard ammunition must be considered during shot-group analysis and the instructor-trainer must ensure the soldier understands that his weapon or ammunition may not be capable of placing three rounds within a 1-centimeter square.
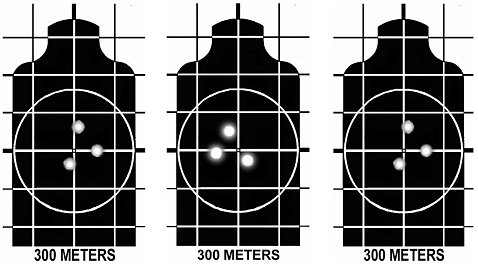
Figure 5-6. Shot groups indicate no firer error.
|
NOTE: |
The following figures and paragraphs discuss indicators that may assist the trainer-coach or firer by identifying potential problems with the firer's four fundamentals. |
(3) 3-Centimeter Shot Groups. The targets shown in Figure 5-7 represent minimum acceptable firing performances. A better firing performance should be expected, and the instructor-trainer should ensure the soldier is properly applying the four marksmanship fundamentals. He should explain that this shot group size is not due to weapon or ammunition performance. The placement of shots in these groups (about 3 centimeters apart on the target) reflects minor shooting error. Any of these three shot groups could have been a minor change in sight picture, breathing, trigger squeeze, position or an erratic round.
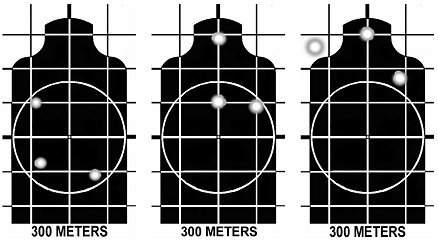
Figure 5-7. Shot groups indicate minor shooting error.
(4) 4- to 5-Centimeter Shot Groups. The targets shown in Figure 5-8 represent unacceptable firing performance. A better firing performance should be expected, and the instructor-trainer should ensure the soldier is properly applying the four marksmanship fundamentals. He should explain that this shot group size is not due to weapon or ammunition performance. The placement of shots in these groups (about 4 to 5 centimeters apart on the target) reflects considerable shooting error. Any of these three shot groups could have been a change in position, sight picture, breathing, trigger squeeze or an erratic round. Firers with these shot groups should receive dry-fire training to help correct firing problems. (See Appendix A for more information.)
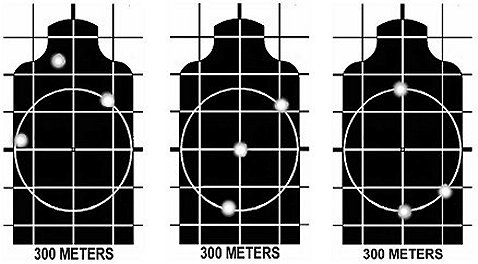
Figure 5-8. Shot groups indicate considerable shooting error.
(5) 6-Centimeter or Larger Shot Groups. The targets shown in Figure 5-9 represent unacceptable firing performance. A better firing performance should be expected, and the instructor-trainer should ensure the soldier is properly applying the four marksmanship fundamentals. He should explain that group size is not due to weapon or ammunition performance. The placement of shots in these groups (more than 6 centimeters apart on the target) reflects major shooting error. Any of these three shot groups could have been a change in position, sight picture, breathing; or trigger squeeze, or the firer may be anticipating the shot. Firers with these shot groups should receive extensive dry-fire training to help correct firing problems. (See Appendix A for more information.)
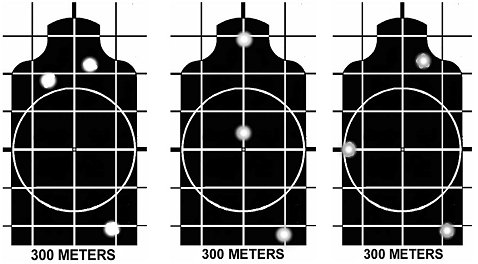
Figure 5-9. Shot groups indicate major shooting error.
e. Multiple Shot-Group Analysis. Shot-grouping analysis is the ongoing analyses of individual shot groups while comparing them to each other for consistent aiming. The instructor-trainer must understand how to mark shot groupings correctly. If the soldier is to benefit from this exercise, and if the instructor-trainer (or coach) is to provide useful guidance, the soldier must mark each shot group individually and locates the center of more than one shot group. In Figure 5-10 three shot groups were fired. Each shot group was individually connected, marking the center of each with a number (1, 2, 3 and so on). Next, the soldier connects the numbers and places an X in the center. The X represents the center of all three shot groups.

Figure 5-10. Central point of three shot groups.
(1) Acceptable Shot-Grouping Performance. The shot groups in Figure 5-11 represent acceptable shot groups (4 centimeters or less) in the same location. A soldier firing this shot grouping should make a sight change of left 10 and down 4. Any change should be clearly marked on the target and saved for reference. The soldier would then be ready to zero his weapon.
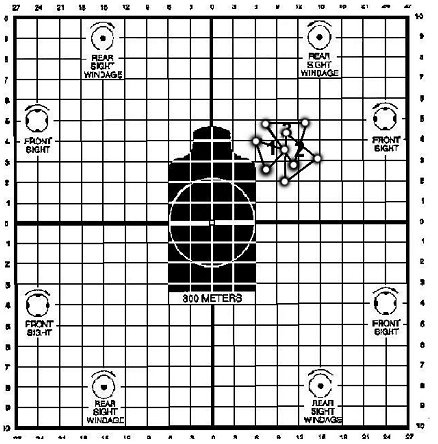
Figure 5-11. Acceptable shot grouping performance.
|
NOTE: |
Location of the shot group on the 25-meter target is not important when conducting a grouping exercise. The size of the shot groups and the dispersion of the shot groupings are the main focus of this exercise. Two consecutive shot groupings must fall within a 4-centimeter circle at 25-meters before the soldier should be allowed to make any adjustments or to start zeroing procedures. |
(2) Shot Groups with Inconsistent Aiming. The groups in Figure 5-12 indicate that the soldier for each shot group is applying proper firing fundamentals, but is using a different aiming point each time a shot group is fired. The soldier's understanding of the aiming process is questioned, and his position checked for consistency. The instructor-trainer cannot determine which shot group best represents the firer's zero.
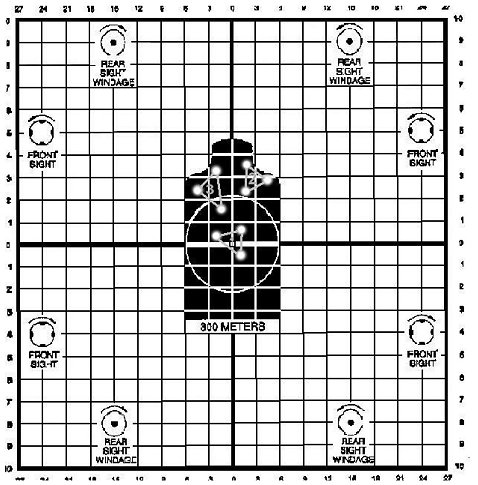
Figure 5-12. Shot groups with inconsistent aiming.
(3) Shot Groups with Consistent Aiming and Major Shooting Error. The groups in Figure 5-13 indicate consistent aiming, but the soldier is not applying the four fundamentals properly while firing each shot group. The firer should be assigned a coach to troubleshoot the soldier's four fundamentals in an attempt to isolate the soldier's firing errors.
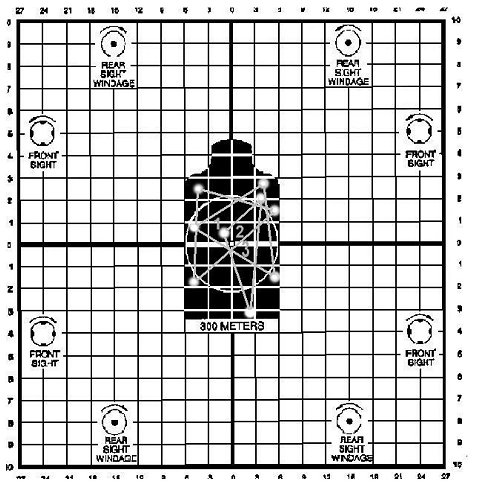
Figure 5-13. Shot groups with consistent aiming and major shooting error.
(4) Shot Groups with Inconsistent Aiming and Major Shooting Error. The groups shown in Figure 5-14 indicate inconsistent aiming and major shooting errors. The firer should be assigned a coach to troubleshoot the soldier's four fundamentals in an attempt to isolate the soldier's firing errors.
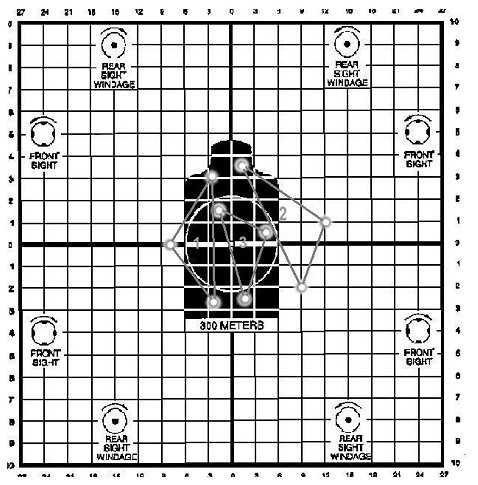
Figure 5-14. Shot groups with inconsistent aiming
and major shooting error.
(5) Shot Groups with Improper Vertical Placement. The shot groups shown in Figure 5-15, when viewed as nine shots, reflect proper horizontal placement of shots but unsatisfactory vertical dispersion. This indicates a failure to vertically aim at target center of mass for each shot. The soldier's aiming procedure is checked along with other marksmanship fundamentals.
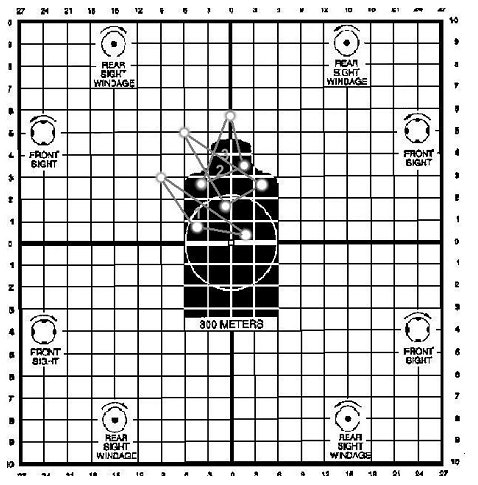
Figure 5-15. Shot groups with improper vertical placement.
(6) Improper Shot Groups on the Edge of the Target. The shot groups shown in Figure 5-16 are improper groups. A sight change is made to bring the groups closer to the target center. A bold sight change should be made to ensure the shot groups remain on the 25-meter zero target.
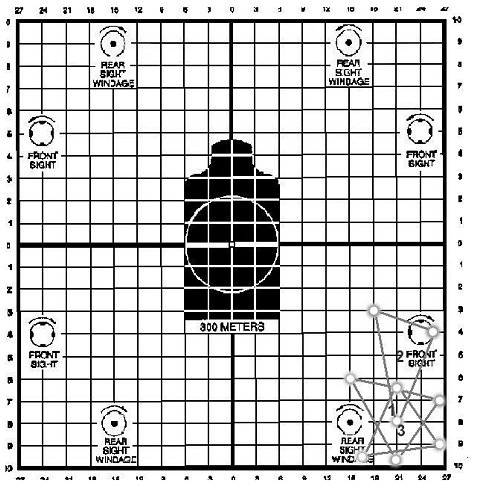
Figure 5-16. Improper shot groups on the edge of the target.
f. Troubleshooting the Fundamentals. The imagination is the only limiting factor in troubleshooting the fundamentals as a coach. The following examples can be used to identify errors in soldier's fundamentals.
(1) Aiming. Attach the M16 sighting device and observe while the soldier fires.
(2) Breathing. Watch the rise and fall of the firer's chest for consistency.
(3) Trigger squeeze. Place your finger over the firer's finger while he fires, feeling for jerking and smooth follow through.
(4) Position. Observe the following areas for consistency:
(5) Other Potential Problem Areas. Ensure-
This paragraph provides guidelines for the instructor-trainer to zero M16-/M4-series weapons at 25 meters and at actual range (Figure 5-17). It includes concept, organization, mechanical zero, zero recording, 25-meter sight settings, field-fire sight settings, and troubleshooting of the fundamentals.
Figure 5-17. Zeroing procedures.
a. The purpose of battlesight zeroing is to align the sights with the weapon's barrel given standard issue ammunition. When this is accomplished correctly, the point of aim and point of impact are the same at a given range such as 250 meters for the M16A1 and 300 meters for the M16A2/A3/A4 and M4-series weapons. This sight setting provides the highest hit probability for most combat targets with minimum adjustment to the aiming point.
(1) When standard zeroing procedures are followed, a properly zeroed rifle for one soldier is close to the zero for another soldier. When a straight line is drawn from target center to the tip of the front sight post and through the center of the rear aperture, it makes little difference whose eye is looking along this line. There are many subtle factors that result in differences among individual zeros. The similarity of individual zeros should be emphasized instead of the differences.
(2) Most firers can fire with the same zeroed rifle if they are properly applying marksmanship fundamentals. This information can be useful in three ways. If a soldier is having difficulty zeroing and the problem cannot be diagnosed, having a good firer zero the rifle could find the problem and eliminates the weapon as part of the problem. When a soldier must fire another soldier's rifle without opportunity to verify the zero by firing, for example, picking up another man's rifle on the battlefield, the rifle will be closer to actual zero if the rifle sights are left unchanged. This information is useful in deciding initial sight settings and recording of zeros. All rifles in the arms room, even those not assigned, should have been previously zeroed by the last soldier it was assigned to. Zeroing this newly assigned weapon should start with the sights left where they are.
(3) There is no relationship between the specific sight settings a soldier uses on his rifle to the sight settings he would zero another rifle to. For example, a soldier could zero his assigned rifle 10 clicks left of center, and then zero another rifle and his adjustments could be 10 clicks right of center. This is due to the manufacturing difference from one rifle to another, which makes it essential that each soldier zeros the rifle that he is assigned. Therefore, all newly assigned personnel should be required to fire their rifle for zero as soon as possible after assignment to the unit. The same rule must apply anytime a soldier is assigned a rifle that is returned from direct support (DS) or general support (GS) maintenance, or the zero is in question.
b. All soldiers should successfully group prior to zeroing. If the unit is proficient at grouping, then two shot groups should be fired to confirm proficiency prior to making any sight adjustments during zeroing procedures.
(1) The unit is divided into firing orders. The first order fires while the second order coaches. Firing points are reserved to conduct corrective instruction. When using smaller ranges, the unit should be divided into three or more orders.
(2) Sandbags should be provided at each firing point to accommodate supported firing positions.
(3) Each shot is fired using the same aiming point (center of mass of the target) from a supported firing position.
(4) Each soldier ensures his sights are set for 25-meter zeroing.
(5) The soldier fires a three-round shot group at the 25-meter zero target. The firing line is cleared, and he moves downrange to examine the shot group. The soldier examines the shot group for fundamental errors, triangulates the shot group and puts the number 1 in the center of the shot group.
(6) Initially the soldier should fire two individual shot groups before a sight change is considered. If the initial shot group is not on paper the weapon should be mechanically zeroed before the soldier fires this weapon again.
(7) The soldier returns to the firing line and fires a second three-round shot group.
(8) The firing line is cleared, and he moves downrange to examine the second shot group, triangulate and mark the center of the shot group with the number 2. The soldier groups the two shot groups and marks the center of the two shot groups with an X. If the two shot groups fall within a 4-centimeter circle the firer determines what sight adjustments need to be made, identifies the closest horizontal and vertical lines to the X, and then reads the 25-meter zero target to determine the proper sight adjustments to make. If the two shot groups did not fall within a 4-centimeter circle the soldier continues grouping.
(9) The soldier then annotates any sight adjustments that need to be made to the weapon on the 25-meter zero target and ensures his name is also on the target. If five out of six rounds fell within the 4-centimeter circle the soldier is zeroed and can be removed from the firing line. (The majority of the round must be inside the circle to be counted.)
(10) The unzeroed soldier returns to the firing line and makes sight adjustments.
(11) Steps 1 through 8 are repeated until the soldier places five out of six consecutive rounds inside the 4-centimeter circle. If the soldier is not zeroed in 18 rounds he should be removed from the firing line and given remedial training before attempting to zero again.
(12) Once firing proficiency has been demonstrated from the supported firing position, zeroing exercises can be conducted from the unsupported firing position. For example, 18 rounds are allocated for the zeroing exercise; if the soldier zeroes in 9 rounds, the soldier can fire the remaining 9 rounds from the unsupported firing position.
c. While applying the fundamentals, the soldier consistently aims center mass of the target as shown in (A) of Figure 5-18. The soldier fires two separate three-round shot groups, as shown in (B) of Figure 5-18, and groups them. Based on the location of these two groups the soldier makes the appropriate sight adjustments. After making the correct sight changes, the soldier fires two more separate three-round shot groups to confirm the adjustments have aligned the sights with the center of the target, and the bullets are in the 4-centimeter circle (Figure 5-19.).
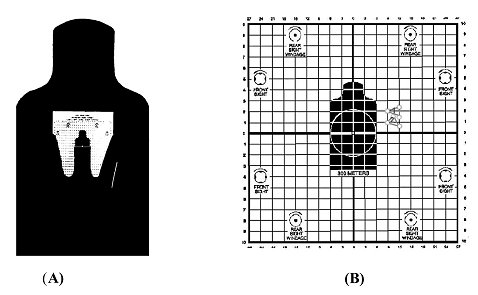
Figure 5-18. Correct aiming (A), initial shot-group results (B).
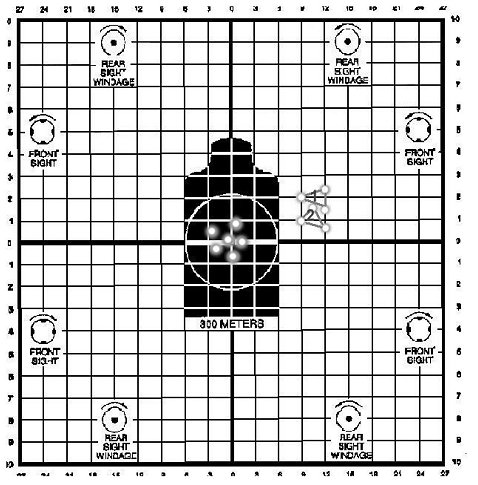
Figure 5-19. Final shot-group results.
This paragraph provides guidelines for the instructor-trainer to conduct a known-distance (KD) range and apply the effects of wind and gravity (Figure 5-20). The three types of KD ranges discussed here are the standard KD range, the KD record fire range, and the modified field-fire range.
|
NOTE: |
If the range is equipped with the location of misses and hits (LOMAH) system, a firing order will be used to operate the LOMAH throughout the period of instruction and will be fired last. When using LOMAH, the zero confirmation is part of the program and will be shot as the first scenario. The soldier will shoot six rounds at the 175-meter/200-yard target while aiming center mass of the target. If the shot group falls within the 11-inch circle on the LOMAH monitor, the soldier will continue the programmed scenario, which is identical to the downrange feedback scenario without LOMAH. If the soldier shoots a shot group that is 11 inches or smaller but is clearly not zeroed, then the instructor-trainer should assist the soldier in making sight adjustments based upon the data provided on the LOMAH monitor. If the shot group is not tight (greater than 11 inches), then the soldier should be removed from the firing line and given remedial training on the four fundamentals of marksmanship. |
Figure 5-20. Downrange feedback.
a. Concept of a Known-Distance Range. A KD range has three primary objectives: fire tight shot groups at a known distance, make sight adjustments at range (not an objective for IET soldiers) while experiencing the effects of wind and gravity, and marksmanship testing. (LOMAH, LMTS, EST, Weaponeer and MACS are training aids discussed in Appendix A that may be used to supplement or substitute this live-fire exercise.) The firing task on a KD range is an intermediate step toward the firing task of a combat soldier. The soldier is provided information concerning the precise hit-or-miss location of every bullet fired. KD firing is conducted with a single, clearly visible target at a known distance, and the soldier can establish a position that provides a natural point of aim on that single target.
(1) On the standard KD range, soldiers fire at the 100-, 200-, and 300-meter targets without any time restraints.
(2) On the KD record fire range, soldiers fire at the 100-, 200-, and 300-meter or yard targets with time restraints.
(3) On the modified field-fire range, soldiers fire at the 100-, 200-, and 300-meter targets on a standard 50- to 300- meter field-fire qualification range. If a qualification range is not available, this exercise may be shot on a standard 75- to 300-meter field-fire range. Targets and target frames must be set up to accommodate this training.
|
NOTE: |
On ranges that are built in yards instead of meters the same KD targets will be used. The difference is so small it does not need to be considered. |
(4) The KD range does not require the soldier to detect targets, estimate range to targets, scan a sector of fire, respond to surprise targets, respond to short exposure targets, or engage multiple targets.
(5) An advantage of a KD range is the ability to see precisely where each bullet hits. To benefit from this training you must ensure the soldiers can clearly see the results of each firing, whether a group, single shot, or 10-round exercise.
b. KD Target Description. Downrange feedback training should include detailed explanations of the targets.
(1) The KD targets are large enough to capture all bullets fired. The standard E-type and F-type silhouettes can be used if the standard KD targets are not available.
(2) The 16-centimeter circle on the 100-meter targets, 32-centimeter circle on the 200-meter targets, and the 48-centimeter circle on the 300-meter targets equate to the 4-centimeter zero target at 25 meters. If the soldier's shot group falls within the 4-centimeter circle at 25 meters they will fall within the circle on the target being shot. If the round falls outside the circle the round will clearly miss the 300-meter target in Figure 5-21.
(3) The X is located in the bottom portion of the circle to show the firer where he must aim so his bullets will hit target center of mass when his rifle is zeroed.
(4) The grid system on the targets in Figure 5-21 equates to the 25-meter zero targets. For example, one click on the front sight post equals one square on the 25-meter zero target and also equals one square on the target being shot. Information similar to that on the zero target has been overprinted to assist in applying sight adjustments.
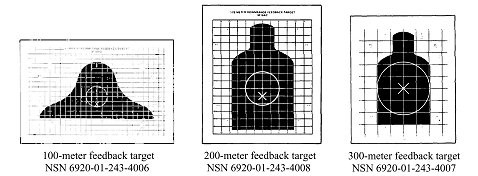
Figure 5-21. Downrange feedback targets.
c. Marking the KD Range Targets. When the initial shot group is fired, target spotters/markers (Figure 5-22) should be placed in each bullet hole, placing the white side on the silhouette and black side off the silhouette. This procedure ensures the firer can see where the rounds impacted. Instructors-trainers can observe the firer's performance and focus their attention on the soldiers having the greatest problems. Soldiers are motivated to fire better since their peers can observe their performance. On the second and subsequent shot groups, the target spotters/markers should be moved and placed in the holes of the new shot group. The old holes must be pasted, using black pastors on black and white pastors on white. Failure to paste all bullet holes makes it difficult to determine one shot group from another.
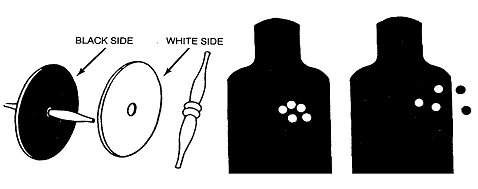
Figure 5-22. Target marking with spotters (markers).
d. KD Shot-Grouping Analysis. Figure 5-23 shows two targets that were both shot with three individual rounds (A). On a pop-up target these two firing performances would provide the same information back to the firing line; each target was hit once and missed twice. Once the targets are properly marked with spotters on a KD range it becomes clear why only one round hit either target. The firer on the left is failing to properly apply the four fundamentals correctly, and the firer on the right needs to make an adjustment to his iron sights (assuming that wind was not a factor). The firer on the right would then triangulate the shot group and read the appropriate adjustments from the target. Figure 5-23 also shows another two targets that were both shot with three individual rounds (B). On a pop-up target these two firing performances would appear to be the same. Once properly marked with spotters on a KD range it is obvious that the firer on the left needs more training on the four fundamentals.
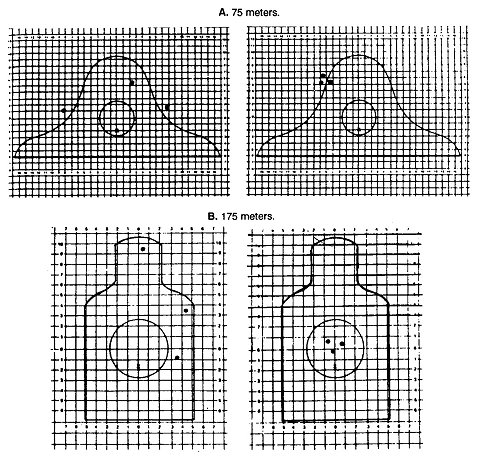
Figure 5-23. Comparison of firing performance.
e. KD Zeroing. The 300-meter target can be used at 300 meters to confirm weapon zero or to refine the zero obtained on the 25-meter range. The zero on this target is more valid than the zero obtained on the 25-meter range when the wind is properly compensated for. Soldiers should fire two 5 round shot groups to confirm zero or three-round shot groups to refine their zero. The pit crews should spot targets after each shot group is fired. If there is more than a five mile-per-hour crosswind, KD zeroing should not be attempted.
|
NOTES: |
1. M16A1. The unmarked aperture (short-range) is used on the M16A1 for refinement of zero at 300 meters. For target engagements beyond the 300-meter line, the long-range aperture (L) is used. |
|
2. M16A2/3/4, M4, and M4A1 weapons. The unmarked aperture is used for zeroing and target engagement at all distances on the KD range. When engaging targets beyond 300 meters the windage knob should be adjusted to the range of the target. 400-meter targets are engaged on the setting 4 flush and 450-meter targets would be set on 4 plus two clicks. |
|
|
3. Basic training soldiers will only zero on the 25-meter range. |
f. Elevation and Windage Adjustments at Distance. The elevation and windage rule states that one click of elevation or windage moves the strike of the bullet a specific distance at a specific range. At a range of 25 meters, one click of windage moves the strike of the bullet .33 centimeters and one click of elevation on the front sight moves the strike of the bullet .83 centimeters. To compute the distance (D) one click of elevation (front sight) or windage moves the strike of a bullet at a given range (R), divide the range (expressed in meters) by 25, and multiply by either .33 centimeters for windage or .83 centimeters for elevation.
|
Windage: D = R ÷ 25m x .33 (D = distance in centimeters). |
|
|
Elevation: D = R ÷ 25m x .83 (R = distance in centimeters). |
(1) Windage. To compute the distance one click of windage moves the strike of the bullet at a range of 300 meters, divide 300 meters by 25 meters and multiply by .33 centimeters.
|
D = 300m ÷ 25m = 12, 12 x .33 = 3.96 centimeters (round this up to 4.0). |
One click of windage moves the strike of the bullet 4 centimeters at 300 meters. (Tables 5-1 and 5-2, show the amount of change in windage of the strike of the bullet at various ranges.)
(2) Elevation-Front Sight. To compute the distance one click of elevation (front sight) moves the strike of the bullet at a range of 300 meters, divide 300 meters by 25 meters and multiply by .83 centimeters.
|
D = 300m ÷ 25m = 12, 12 x .83 = 9.96 centimeters (round this up to 10 cm). |
One click of elevation on the front sight moves the strike of the bullet 10 centimeters at a range of 300 meters. (Tables 5-1 and 5-2 show the amount of change in elevation of the strike of the bullet at various ranges.)
(3) Elevation-Rear Sight. The elevation knob adjusts elevation 1.1 inch for each click at 100 meters with each dot and each number representing one click of elevation.
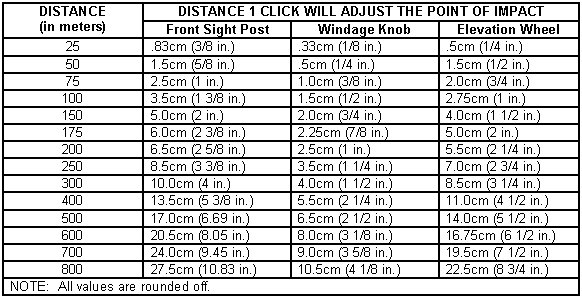
Table 5-1. M16A2/3 and front sight post of an M16A4.
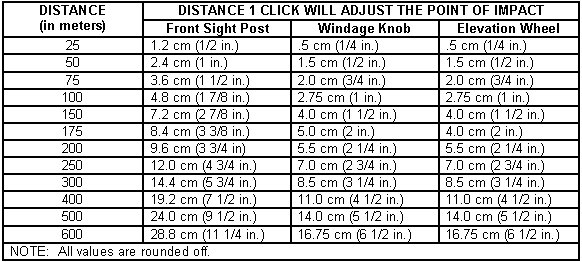
Table 5-2. M4/M4A1 and windage of an M16A4.
g. Conduct of a Standard KD Range. The standard KD range is conducted with paper targets at 100, 200, and 300 meters (Figure 5-24). Shot groups are fired progressively at the targets. Half the bullets are fired from the supported firing position and the other half from the unsupported firing position. The wind speed and direction must be determined before firing and the firer must know the distance to the target. After each shot group is fired the targets are marked. Based on this feedback, soldiers receive a critique from their instructor-trainer or coach, and apply adjusted aiming points as necessary. The downrange feedback exercise must be conducted within the constraints of time, ammunition, and available ranges. If 30 rounds of ammunition are available for training, firing three-round shot groups 10 times is preferable to firing five-round shot groups 6 times. Once the soldier understands the concept for adjusting the aiming point to compensate for the effects of wind and gravity, he is ready to apply his knowledge on the field-fire range.
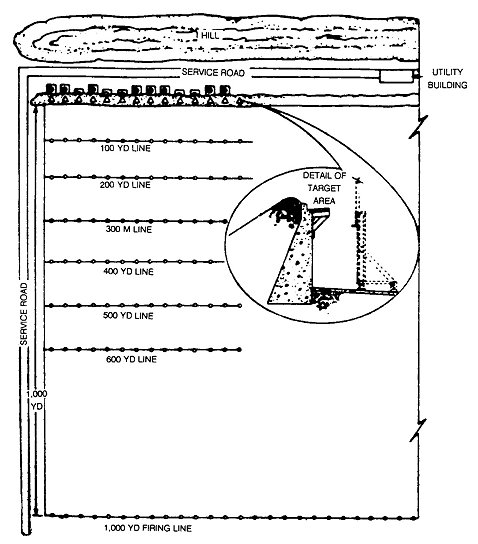
Figure 5-24. Known-distance range.
(1) 100-Meter Targets. Feedback can be provided after each round, each three-round shot group, or each five-round shot group on the 100-meter feedback targets. No time limit is placed on the firer. Soldiers fire from the supported firing position and from the unsupported firing position. The targets are then marked and evaluated. Feedback consists of a critique of performance, adjustments to point of aim, effects of wind and gravity, and shot placement. Target spotters mark the bullet holes so hits can be viewed from the firing line.
|
NOTE: |
Basic training soldiers will fire one five-round shot group from the supported and one five-round shot group from the unsupported firing positions. They must hit 8 out of 10. |
(2) 200-Meter Targets. Firers engage the 200-meter target using the same downrange procedure as the 100-meter target.
|
NOTE: |
Basic training soldiers will fire 10 rounds from the supported and 10 rounds from the unsupported firing positions. They must hit 14 out of 20. |
(3) 300-Meter Targets. Firers engage the 300-meter target using the same downrange procedure as the 100-meter target.
|
NOTE: |
Basic training soldiers will fire one five-round shot group from the supported and one five-round shot group from the unsupported firing positions. They must hit 8 out of 10. |
h. KD Record Fire Range. The KD record fire range gives soldiers the chance to engage targets at range with time constraints and feedback. The effects of wind and gravity are demonstrated while firing on the course. Before firing the course, all soldiers confirm the zero of their assigned rifles at 300 meters with six rounds. The six zero rounds are fired in the prone supported position from the 300-meter line before qualification-zero rounds do not count for score. The firers are given two minutes to fire 20 rounds at the 300-meter target from a supported firing position. The firing line is moved to the 200-meter line and firers are given 60 seconds to fire 10 rounds at the 200-meter target from an unsupported firing position. The firing line is moved to the 100-meter line and firers are given 60 seconds to fire 10 rounds at the 100-meter target from an unsupported firing position. Qualification standards for the KD alternate course are:
i. Modified Field-Fire Range. A modified field-fire range can be used for downrange feedback. To conduct downrange feedback, minor changes must be made to a standard field-fire range. Target frames, like those used on the 25-meter range, are placed on a standard qualification range at 100, 200, and 300 meters. The standard KD range or the KD record fire range can be conducted on the modified field-fire range.
|
NOTE: |
The firing line will have to be cleared, moved to the targets for marking, and returned each time a firing order fires. |
j. Record of Performance. During the conduct of downrange feedback, a record of performance should be kept for an after-action review. (See Appendix B for a blank reproducible copy of the KD scorecards.) As soldiers complete each phase and achieve the performance standard for that range, they should receive a critique. Instructors-trainers must ensure soldiers do not progress to a greater range until they become proficient at closer ranges. For example, the soldier who is having problems firing a 6-inch group at 100 meters should not be expected to fire an 11-inch group at 200 meters-progressing to greater ranges would only frustrate the soldier.
k. 25-Meter Zero Standard (Figure 5-25). A standard E-type silhouette is 48.26 centimeters wide; a circle (angle) that is 48.26 centimeters at 300 meters is 4 centimeters at 25 meters. A soldier who can fire all bullets in a 4-centimeter circle at 25-meters and adjusts the sights for zero will hit the target at all ranges out to 300 meters.
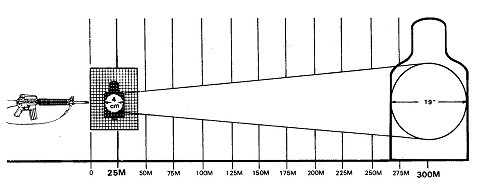
Figure 5-25. The 25-meter zero standard.
Marksmanship instructors-trainers should know how the effects of wind and gravity influence the flight of the bullet, and soldiers should know how to compensate for such bullet displacement. This instruction is appropriate for all marksmanship training and concurrent training.
a. Effects of Gravity. Gases created by gunpowder push each round out the end of the barrel. The barrel must be elevated slightly to allow the round to travel farther, creating an arc. The round will travel straight until it slows down and is gradually pulled down to the ground by gravity. Each round fired will be pushed approximately the same distance and will roughly follow the same path. When the firer zeroes his weapon he is aligning his line of sight to cross the path of the round at the distance he wants to zero his weapon. For example, a 300-meter zero means that the line of sight will cross the path of the round at 300 meters. If the firer is going to engage a target at a distance other than 300 meters (excluding 25 meters) the path of the round will hit the target either before or after it crosses the line of sight. If the firer wants his rounds to impact center of mass he will have to adjust his aiming point up or down to account for gravity. The farther the round travels the faster it begins to fall.
b. Adjusted Aiming Point Based on Gravity. An adjusted aiming point (Figure 5-26) is intended to increase hit probability when properly presented. However, soldiers can be easily confused, which could result in degraded performance. All soldiers should be taught to aim center mass unless they are confident they know the range to the target. If adjusting the point of aim confuses the soldier he should aim center mass of the target. Using these aiming points places the center of each shot group center mass of the target (assuming a perfect zero and no shooter error). These adjustments are small and should only be applied by competent firers who wish to improve their firing performance. Because the difference between the M16-/M4-series weapons is so small, and to avoid confusion, the same adjusted aiming points should be used regardless of the weapon being fired.
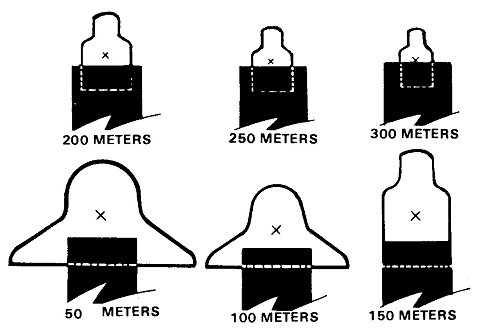
Figure 5-26. M16-/M4-series weapons aiming points.
c. Effects of Wind. Wind affects the bullet similar to the way gravity does: the farther the round travels the farther the wind will push the round in the direction the wind is blowing. The faster the wind is blowing the farther the wind will push the bullet.
(1) Wind Direction. The effects of wind vary depending on changes in wind speed and direction. Wind is classified by the direction it is blowing in relationship to the firer-target line. The clock system is used to indicate wind direction and value (Figure 5-27).
(a) Winds that blow from the left (9 o'clock) or right (3 o'clock) are called full-value winds, because they have the most effect on the bullet.
(b) Winds that blow at an angle from the front or rear are called half-value winds, because they have about one-half the effect on the bullet as full value winds.
(c) Winds that blow straight into the firer's face or winds that blow straight into the target are termed no-value winds, because their effect on the bullet is too small to be concerned with.
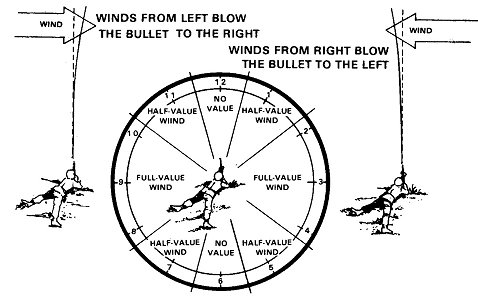
Figure 5-27. Determine wind value using the clock method.
(2) Wind Speed. Wind is highly variable and sometimes quite different at the firing position than at the target position. Even though the wind is blowing hard at the firing line, trees, brush, or terrain could protect the bullet path. The wind can vary by several miles per hour between the time a measurement is taken and when the bullet is fired. Therefore, training time should not be wasted trying to teach soldiers an exact way to measure wind speed. Soldiers should understand that the wind can blow the bullet off course but they should not overcompensate and miss targets because of applying too much hold-off. A wind gauge can be used for precise measurement of wind velocity. When a gauge is not available, velocity is estimated by one of the following methods.
(a) Flag Method. If the firer can observe a flag or any cloth-like material hanging from a pole, he should be able to estimate the angle formed at the juncture of the flag and pole. As shown in Figure 5-28, dividing this angle by the constant number 4 equals the wind velocity in miles per hour.

Figure 5-28. Determine wind speed using the flag method.
(b) Pointing Method. If a flag is not visible, a piece of paper, leaf or other light material can be dropped from the shoulder. By pointing directly at the spot where it lands, the angle can be estimated. As shown in Figure 5-29, dividing this angle by the number 4 determines the approximate wind speed in miles per hour. This indicates conditions at the firing position, which could be different at the target position.
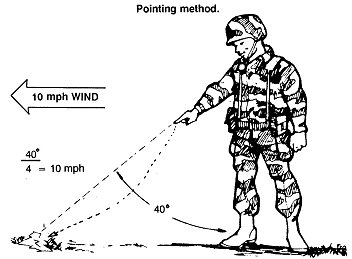
Figure 5-29. Determine wind speed using the pointing method.
(c) Observation Method. If the flag or pointing methods cannot be used, the following information can assist in determining wind velocities:
d. Adjusted Aiming Point Based on Wind Speed. Figure 5-30 illustrates how the effects of wind on the bullet are similar to the effects of gravity-as range increases, the effect of wind increases. A 10-mile-per-hour full-value wind moves an M16A1 (M193) bullet from about 1/2 of an inch at 25 meters to about 15 inches at 300 meters. (Using the data presented in Table 5-3, wind effects for all conditions can be determined.) A wind of greater speed increases bullet movement by a uniform amount-a 15-mile-per-hour wind moves the bullet 3/4 of an inch at 25 meters and about 22.5 inches at 300 meters. A half-value wind would move the strike of the round in a 10-mile-per-hour wind 1/4 of an inch at 25 meters and 7.5 inches at 300 meters. (This chart can be used for M855 ammunition, also.)
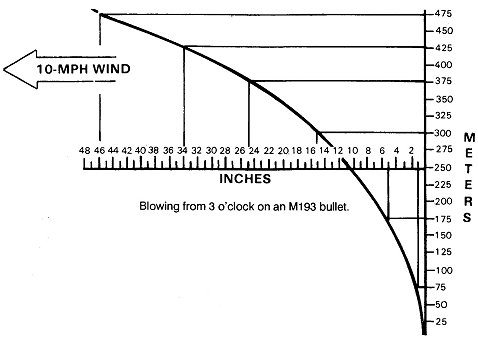
Figure 5-30. Calculate the adjusted aiming point based on wind speed.
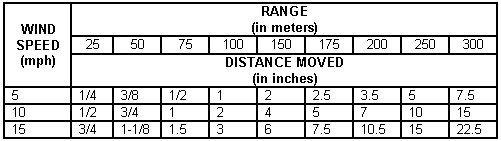
Table 5-3. Calculated adjusted aiming point based
on wind speed (full value).
e. Adjusted Aiming Point Based on Gravity and Wind Speed (Figure 5-31). Wind has a minor effect on the M16 bullet relative to the size of the target at ranges out to 100 meters. When engaging targets in excess of 150 meters in heavy winds, adjusting the aiming point for the wind increases the probability of a hit. Wind effects are uniform in relation to speed-that is, a 5-mile-per-hour wind has one-half the effect of a 10-mile-per-hour wind, and a 20-mile-per-hour wind has twice the effect of a 10-mile-per-hour wind.
(a) Firers must adjust their aiming point into the wind to compensate for the effects of wind. If they miss a distant target and the wind is blowing from the right, they should aim to the right for the next shot. A guide for the initial adjustment is to split the front sight post on the edge of the target facing the wind.
(b) The newly assigned soldier should aim at center mass for the first shot, then adjust for wind when he is confident the wind caused the target miss. Experienced firers should be able to apply the appropriate hold-off for the first shot, but the basic rule must be followed-when in doubt, aim at center mass.
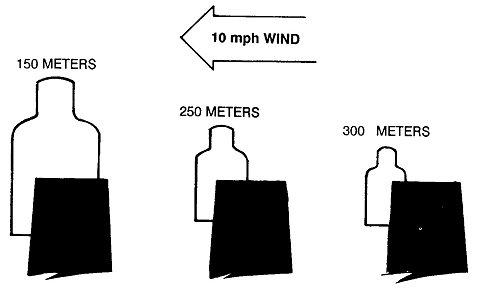
Figure 5-31. M16-/M4-series weapons adjusted aiming point
based on wind speed.
Commanders and marksmanship trainers must understand some aspects of ballistics to teach the principles of zeroing and engagement of long-range targets. Ballistics is a science dealing with the motion and flight characteristics of projectiles. The study of ballistics in rifles is divided into three categories: internal, external, and terminal.
a. Internal Ballistics. The overall dimensions of the combat service 5.56-mm cartridges are the same, which allows cartridges to be fired safely in M16A1 or M16A2 rifles and the M4 carbine. There are internal differences that affect firing accuracy. An ammunition comparison is provided in Figure 5-32.
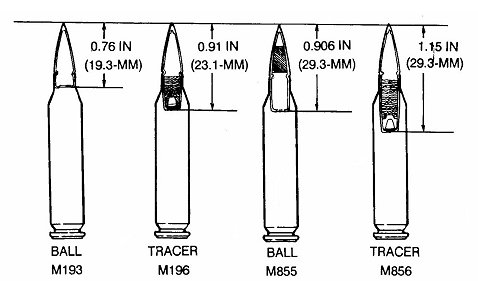
Figure 5-32. Projectile differences.
(1) The increase in projectile length, weight, and configuration of the M855 bullet requires different twists in the barrels, lands, and grooves to stabilize the bullet in flight. The M16A1 has a 1:12 barrel twist (the bullet rotates once for every 12 inches of travel down the barrel). The M16A2/A3/A4 and the M4 carbine has a 1:7 barrel twist (the bullet rotates once for every 7 inches of travel down the barrel).
(2) The M16A1, with its 1:12 twist, does not put enough spin on the heavier M855 bullet to stabilize it in flight, causing erratic performance and inaccuracy for training or full combat usage (30.48- to 35.56-centimeter shot group at 91.4 meters and 72-inch shot group at 274.2 meters) (Figure 5-33). Although firing the M855 cartridge in the M16A1 rifle is safe, it should only be used in a combat emergency, and then only for close ranges of 91.4 meters or less.
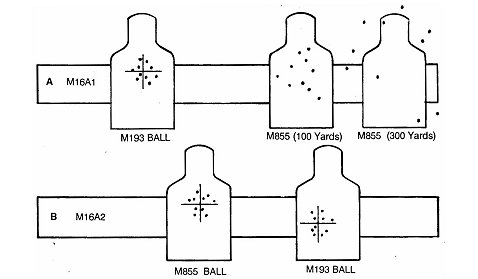
Figure 5-33. Ammunition impact comparison.
(3) The M16A2 rifle with its 1:7 twist fires both types ammunition with little difference in accuracy to a range of 500 meters. The M16A2 and its ammunition are more effective at ranges out to and beyond 500 meters due to a better stabilization of the round.
(4) The two 10-round shot groups in Figure 5-33, A were fired by a skilled marksman at a distance of 274.2 meters using the same M16A1 rifle. The 25.4-centimeter shot group on the left was fired (and zeroed) with M193 ammunition. The 6-foot shot group on the left was fired with M855 ammunition.
(5) Figure 5-33, B shows two 25.4-centimeter shot groups fired by the same skilled marksman at a distance of 274.2 meters using an M16A2 rifle. The shot group on the left was fired (and zeroed) with M855 ammunition. The shot group on the right was fired using M193 ammunition.
(6) As stated previously M193 and M855 ammunition can be fired from an M16A2-/A4-series weapon. Table 5-4 and Figure 5-34, show the difference between a rifle zeroed with M855 ammunition and then re-zeroed with M193 ammunition at 300 meters. There is practically no difference between the trajectory of the rounds or the impact of the rounds on target.
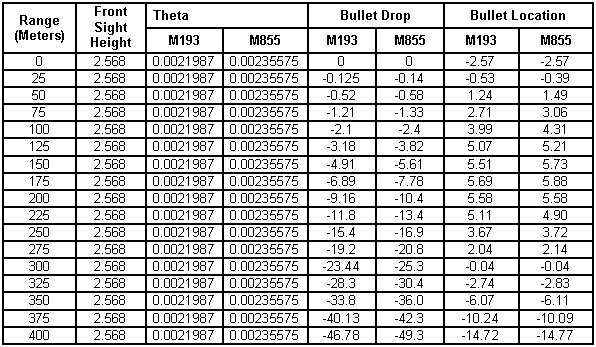
Table 5-4. M855 zeroed at 300 meters; M193 re-zeroed at 300 meters.
Figure 5-34. M855 zeroed at 300 meters; M193 re-zeroed at 300 meters.
(a) When zeroing M855 and M193 at 25 meters, the difference in the ammunition becomes apparent as shown in Table 5-5 and Figure 5-35. If firing M193 ammunition from an M16A2 rifle, the rifle should be zeroed with M193 ammunition.
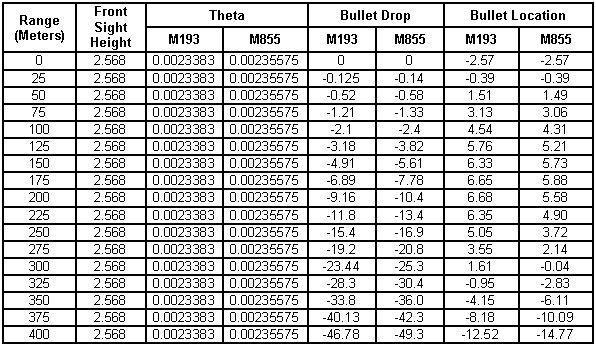
Table 5-5. M855 zeroed at 25 meters; M193 re-zeroed at 25 meters.
Figure 5-35. M855 zeroed at 25 meters; M193 re-zeroed at 25 meters.
(b) If an M16A2/A4 rifle has been zeroed at 25 meters using M855 ammunition and M193 ammunition is fired without re-zeroing, then the difference in the impact of the round on target varies between ammunition as shown in Table 5-6 and Figure 5-36.
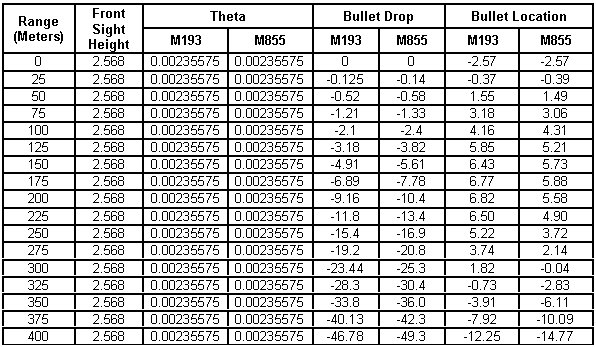
Table 5-6. M855 zeroed at 25 meters; M193 fired using M855 zero.
Figure 5-36. M855 zeroed at 25 meters; M193 fired using M855 zero.
|
NOTE: |
Both the M193 and M855 ball ammunition can be used in training and accurately function in the M16A2/3/4 and M4 carbine. Do not switch between the types during firing. Do not zero with one type, and then fire the other for any type of training. Due to the different characteristics of each round, zero with the same type ammunition used for training. |
(7) A simple rule of thumb that will preclude any problem is to use only the ammunition specifically designed for each rifle (M193 ball ammunition for the M16A1; M855 ball ammunition for the M16A2/3/4).
b. External Ballistics. Soldiers must understand the basics of external ballistics so they can make necessary scope adjustments or hold compensations to allow them to hit the target. The external ballistic factors that affect bullet trajectory are:
(1) Gravity. The force of gravity on a bullet is constant regardless of its weight, shape, or velocity. The longer a bullet is in the air or the greater its angle from the vertical, the more effect gravity will have on its trajectory. (See paragraph 5-4 for more information on the effects of gravity.)
(2) Muzzle Velocity. Muzzle velocity is the speed of a bullet as it leaves the barrel, measured in feet per second. Muzzle velocity diminishes as the bullet gets farther away. The bullet reaches its maximum velocity 76 feet from the end of the rifle and slows down from there until it reaches the target.
(3) Air Resistance or Drag. Air resistance or drag immediately produces a slowing effect on a bullet.
(4) Altitude and or Air Density. The greater the altitude, the thinner the air and the longer the bullet will travel (with a correspondingly flatter trajectory). Each 5,000-foot elevation will raise the strike of the bullet 1/2 to 1 minute of angle.
(5) Temperature. Deviation from standard daytime temperature (59 degrees Fahrenheit/15 degrees Celsius) affects bullet trajectory.
(a) Cold air is denser than warm air meaning the bullet must travel through more tightly packed air particles. This causes the bullet to lose velocity resulting in the impact being lower than the intended point of impact. Cooler air also causes lower chamber pressure, which reduces the initial velocity.
(b) Warm or hot temperatures cause the strike of the round to move up.
(6) Trajectory. When a projectile exits the muzzle of a rifle, it drops from the line of departure, otherwise known as the center-bore line. As the projectile travels downrange, the velocity is decreased by air drag, giving way to the inevitable force of gravity. This effect creates trajectory.
(a) Line of Sight. The line of sight is an imaginary straight line extending from the shooter's eye through the telescopic sight, or rear and front sight, to the target.
(b) Line of Departure. The line of departure is an imaginary straight line extending from the center of the barrel to infinity.
(c) Zero Range. Zero range is where the projectile intersects the line of sight. It occurs at two points-one on the way up and one on the way down.
(d) Apex. Otherwise known as midrange trajectory, the apex is the point where the projectile is at its highest in relation to the line of sight.
(e) Bullet Path. The bullet path is the relationship of a projectile and the line of sight at any given range (normally expressed in inches).
(7) Wind. Although gravity and air drag are the only forces that act on the trajectory, other external factors influence the trajectory relative to the point of aim such as wind, altitude, temperature, humidity, and barometric pressure. Wind is by far the most significant.
(a) Because the bullet is moving through the air, the air moves the bullet. Wind deflection is always in the same direction the wind is moving. A wind blowing from the left will move the bullet to the right. Deflection decreases as the angle of the wind to the line of flight decreases. Reading and correcting for wind effectively takes practice, especially at longer ranges where accuracy in correcting is more critical.
(b) To shoot accurately in the wind, a shooter must know the wind velocity, wind direction, and the value of deflection at the range at which he is shooting. (See paragraph 5-4 for more information on wind direction.)
(8) Angles. Firing uphill or downhill normally causes the bullet to hit high relative to a horizontal trajectory. If the shooter is firing on an angle up or down at a slanted range of 100 yards, the point of impact will be higher than it would be for a level shot of 100 yards. How high depends on the angle.
(a) Gravity acts on a bullet only during the horizontal component of its flight (the distance from the shooter to the target measured as if they were both at the same level). Since the horizontal component will always be less than the slanted range, gravity will not pull the bullet down as far as it would if the range were level.
(b) The complicating factor in shooting uphill or downhill is that the wind will affect the shot over the entire slant range. The shooter should aim at the target as if it were 25 yards away and correct for wind as if it were 400 yards away. The correct method for shooting uphill or downhill is to adjust elevation based on the horizontal range, and correct for wind deflection based on the slanted range.
c. Terminal Ballistics. Bullet penetration depends on the range, velocity, bullet characteristics, and target material. Greater penetration does not always occur at close range with certain materials since the high velocity of the 5.56-mm bullet causes it to disintegrate soon after impact.
d. Bullet Dispersion at Range. Instructors-trainers must have a working knowledge of the effects of bullet dispersion and accuracy at various ranges.
(1) Minute of Angle. A minute of angle (a term used to discuss shot dispersion) is the standard unit of measurement used in adjusting rifle sights and other ballistic-related measurements. It is also used to indicate the accuracy of a rifle. A circle is divided into 360 degrees. Each degree is further divided into 60 minutes; therefore, a circle contains 21,600 minutes. A minute of angle is an angle beginning at the muzzle that would cover 2.54 centimeters at a distance of 91.4 meters (Figure 5-37). When the range is increased to 182.8 meters, the angle covers twice the distance, or 5.08 centimeters. The rule applies as range increases-7.62 centimeters at 274.2 meters, 10.16 centimeters at 365.6 meters, and so on.
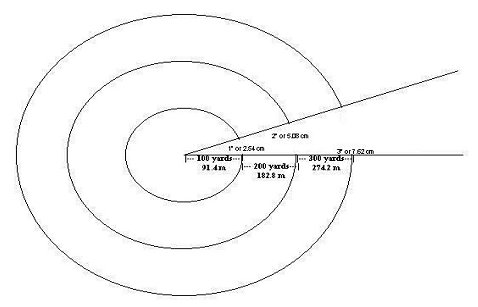
Figure 5-37. Minute of angle.
(2) Increase of Shot-Group Size. Just as the distance covered by a minute of angle increases each time the range increases, a shot group can be expected to do the same. If there are 2.54 centimeters between bullets on a 25-meter target, there will be an additional 2.54 centimeters of dispersion for each additional 25 meters of range. A 2.54-centimeter group at 25 meters (about 3.5 minute of angle) is equal to a 25.4-centimeter shot group at 250 meters (Figure 5-38).
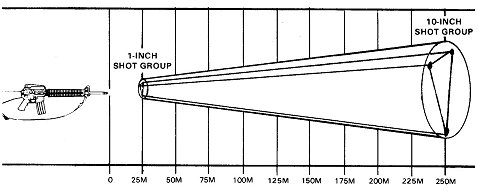
Figure 5-38. Increase in shot-group size as range increases.